

Small Update (12.07.23): Version 3.9 of the script currently has issues for some people. I assume that the required access rights have changed. You can force Version 3.8 (that still works) by using Install-Script Get-WindowsAutopilotInfo -RequiredVersion 3.8
I won’t go into the details of why Get-WindowsAutopilotInfo works differently now. You may also want to read about this change here Azure AD to Microsoft Graph migration for Azure command line tools. – Microsoft Community Hub. In this entry – very quickly – what you need to do to get the script working again. There are at least two ways to slice this pizza. If you want to continue importing Autopilot devices using Get-WindowsAutoPilotInfo read on.
Table of Contents
Steps overview
- Find someone with appropriate access to add the required Enterprise Application and have them run the script and/or…
- Adjust the permissions on the (existing) Enterprise Application so that you can use it.
Step 1 – Find someone with appropriate Azure access
To do this, first run Get-Windowsautopilotinfo -Online as you usually would. If you want the verbose output as before, use The script has been updated and now shows the verbose output by default again. Add any other switches (such as -InformationAction Continue as well.-GroupTag) as well.
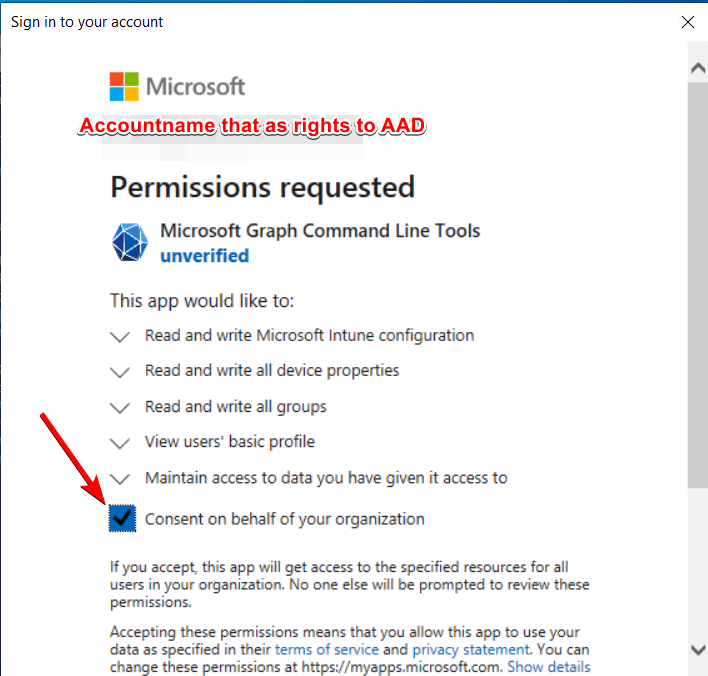
The “bad” news first: You must be a global admin (GA) or have another GA that can run the script for you. When it runs, the script will ask you to “Consent on behalf of your organization” just like any other Azure AD app. Depending on the age of the tenant, the app may also already exist in your AAD tenant, because someone already needed it. In this case, the permissions will be adjusted to match the requirements for adding devices to Autopilot (assuming the appropriate account permissions to the Enterprise Application). These permissions are always delegated, so a user who has access to the app doesn’t automatically have the access to use the actions provided by the Graph API. The app is just a bridge to the actual object, the user still needs the appropriate role(s).
Using the same account you just used to add the enterprise applications, you can now add devices again. But what if the application already exists or you want to delegate permissions to other users/groups?
Step 2 – Fix your access to the app
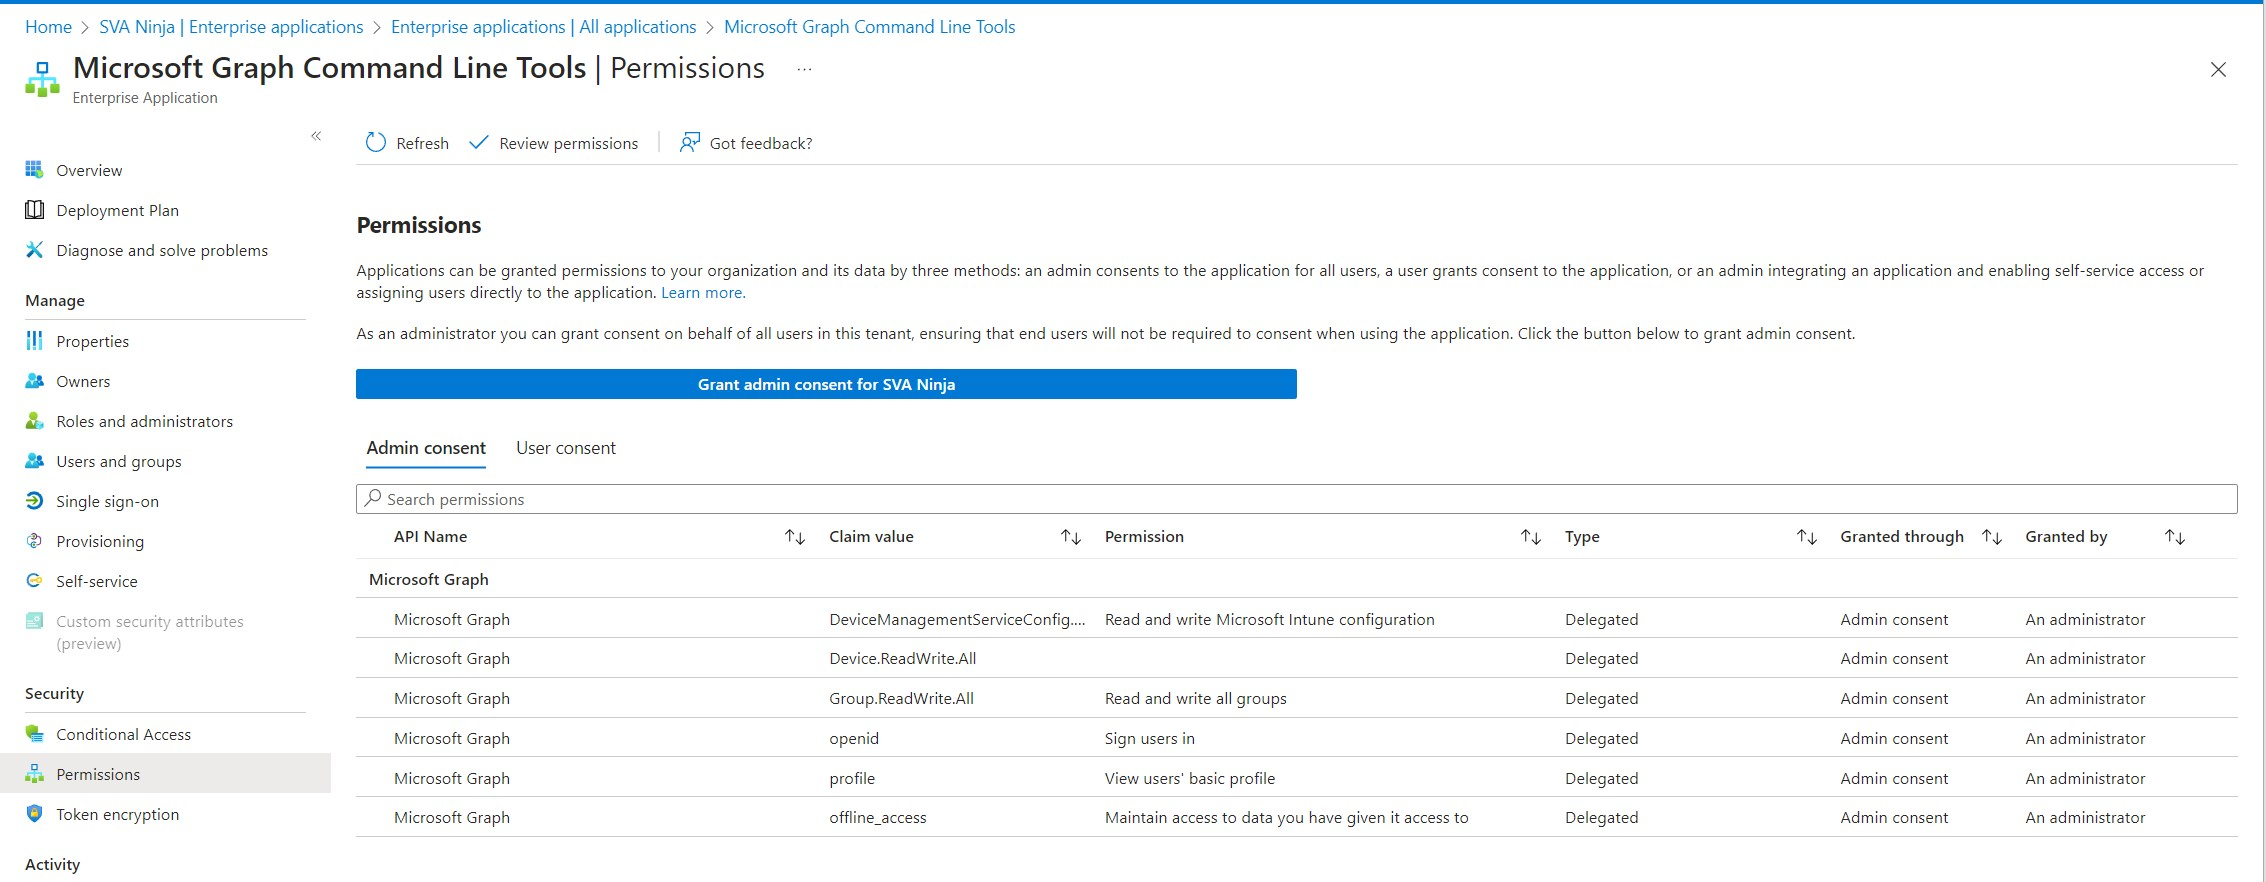
In Azure AD -> Enterprise Applications, you will see a new application called “Microsoft Graph Command Line Tools” or (due to a recent name change) with the old name “Microsoft Graph PowerShell”. After checking the permissions (see screenshot below) you can add more users/groups to access this app using “Users and Groups”. There is only “Default Access” available as a role. Remember that the users/groups must already have access to the objects/resources they are supposed to access (e.g. Intune Administrator or a custom role). Hit “Assign” and voila – you’re done.
(Alternative Solution) Add an Azure AD App Registration manually
This approach is not that common and probably won’t be used on a large scale – however, if you have used Get-WindowsAutoPilotInfo inside a script or logic app (highly recommended!), this might be of interest to you. You can specify your own application registration! However, there are two drawbacks:
- The permissions can only be of the Application type – the “Microsoft Graph Command Line Tools” use delegated permissions.
- The only way to access the application is to use an application secret, which is basically an unencrypted password.
If you still want to do this, you create a new App Registration (usually you just want to give it a name and move on). Make a note of your tenant ID and the new application ID, as we will need them in a second. Assign the same permissions (see the ‘Microsoft Graph Command Line Tools Permissions’ screenshot) as the ‘Application‘ type to the App Registration. As in step 1, get a global admin to click the “Grant admin consent for […]” button for you if you don’t have access to it. After that, add users/groups to the now new Enterprise Application with the same name you used for your app registration, the same way you added them in step 2.
Finally, get the app secret by navigating to “Certificates & Secrets”, go to “Client secrets” and add a new secret. The recommended expiration date is 180 days – don’t forget to copy the secret. Now you can build your new command as follows.
Please be aware, that this will remove the permissions shown in “Microsoft Graph Command Line Tools permissions” from the Enterprise Application again.
Get-WindowsAutoPilotInfo.ps1 -Online -InformationAction Continue -GroupTag AADJ -AssignedUser Joergen.Mueller@sva.ninja a -TenantId d36eed9c-6ef6-45dc-9113-0065b0b3030d -AppId cf64d17d-9efb-438f-8d31-3fd0db0d5912 -AppSecret ZCO8Q~12gt24z435uhhsc1$.Q_qS6SfTMWb2e